Tuesday, January 4, 2011

blogPost.title

     So here's a sketch of an idea i had for something i've been wanting to try in maya for quite some time but never knew if it was something i'd be able to do (without spending an eternity forum/tut hopping in hopes of finding the answers) and i think after i do a bit more research i'll be able to do something like it. The idea is to call for particles to either be emitted from the sphere center or at any random location within the sphere and have a mild velocity going outward. Place a cube somewhere in the sphere and record the location of its 8 vertices. Then, use the "position" of each particle to write an If/THEN expression that basically states: IF a particle's location is within these vecotrs (x,y,z locations) then it's color will change to a random value between white (what all the particles are by default) and blue.

I've learned a bit about writing expression in the past few days, but i haven't learned about conditional statements/test/whatnot yet...so i'll see if i can't figure out an expression for this and give it a go. If anything, i might just be able to use dynamics and state that whenever a particle comes in contact with the cube (which obviously wouldn't be rendered) it'll change to a random color within a given range...so either way i'm sure i'll come up with a technique to make this idea happen.

Sunday, January 2, 2011

What's on Draft?

     Here's a rough 3D mock of how i imagined 2 parts of the city being - the Merchant & Guild Quarters (though 'quarters' might be switched out by something else depending on the kind of vocabulary i choose to use in the world). Merchant Quarters are where most shops and bazaars and such are, where as the Guild Quarters are where guilds and things of that sort are located (a lot of quests originate here).


     This is just another angle of the work thus far...closer up just so you can get a feel for the size of the dividing inner-city walls and the larger outer wall. Its all just quick concepts and such right now...so a bit of this might change (or just get greater detail).


     Here's a quick mock i made of archives before working on the town layout - just setting out basic shapes to get a general feel for what may or may not work in the long run. Size/details will definitely change as i realized some of what's in the picture won't really work in the end...but the overall 'feel' will kind of be the same.

Saturday, January 1, 2011

Finally!!!1|1|11

    So it's been a long time since i've made a substantial posting, and it probably be longer still ttill there's anything really worth it on here - but i figure since i've got the shit to put on here...why not do it anyway?

     So this is the concept i came up with for the wall that goes around the main/initial town in my story (it would be the equivalent to Traverse or Twilight Town from Kingdom Hearts I/II). I was heavily influenced by the Great Walls of Ba Sing Se (from Avatar: The Last Airbender), but there were a few times where the wall just seemed...funny and whimsicle because of how it rose/fell and weaved along the mountain crest.


     I can understand why a wall built like this would have an ever-changing 'levelness', but since there's elemental manipulation in my story, i don't want to be limited to "real world" mechanics...which is kind of why i find some of these pictures i captured so funny.


     This is a pretty good kind of "middle ground" between the rise/fall of the terrain and the levelness of the wall. Again, i wanted mine to be a constant height, so this would only partially represent my idea.


     This is the kind of...aesthetic i'm going for in my wall design - grand, towering, impenetrable, almost as if it weren't man-made. I mean, the ground at the base of the wall isn't 100% level, but they maintain a constant height all around the inner-city. There's far less terrain near the city of Ba Sing Se than in my story, but the constant height thing is almost a must for me.


    This was a concept sketch i came up with for for my main town (after the post below this one, but before my design for the wall) and it might not make much sense to the viewer without any insight into my story/worl, but i'll eventually have some 3D mock-ups going on to illustrate the train routes and underlying terrain (i was kind of aiming for a small mountain/hill range encircling one larger mountain/hill that would have the Archives library sitting atop it)

More sketches and designs to come soon now that i've dusted off my Wacom tablet and found it far easier to sketch "layered" ideas in photoshop than on paper and then transfer.

Sunday, August 15, 2010

Train-ing


This is just a draft (slightly composited with some touch-ups in photoshop) of what i'm thinking of making the layout of my first major town (and hugely skill-tasking project) of Quinsa. Since it's going to be a sort of hub where alot of different trains, people, goods, and what have you come through, i gave the train layout a lot of thought (and try not to picture a single set of tracks along each line...there's going to be a few sets and maybe another level in some places - sometimes a larger train will utilize two sets of tracks because it's so huge).

So i'm going to finish touching it up tomorrow and should have a clear 'inked'/line version ready along with some better place markers and more flair.

Just uploading to have a place other than my hard drive to put it.

Wednesday, April 28, 2010

Pump-King

          So this is a well overdue assignment for my Texture & Lighting class - though it's been done for a little while, it's been overdue to be posted on my blog for your eyes to see. What the project is, is that we're given a model of a pumpkin (as you can plainly see) and using only a noiseNode and adjusting the settings of that and the PhongE shader (so no actual 'texture' file used) we have to make a 'Chocolate', 'Copper', 'Leather', & 'Orange Peel' pumpkin. It's to teach us how things can be achieved using nothing but procedural textures. They should be pretty obvious which pumpkin is which material, but the only one i couldn't pin down is the Copper one - to me it still looks like a milk chocolatey kind of material.

-- Enjoy

Tuesday, April 13, 2010

Dr. Suits?

          I read this comic this past sunday (i recently started liking Pearls Before Swine because of the kind of humor the author puts into the comics) and thought it was well worth putting on my blog as a random post.

Wednesday, March 31, 2010

...For Texture

          So it's been a while since i posted anything for....well anything. I've recently had to go part time at work (and i mean über part time...) so i could have excess time to get caught up with school work and everything else that has since been let go.

          So as i'm taking a break from the extremely large amount of demonstrational videos i've been watching, i figure i'll post some stuff on my blog and hopefully keep it up as the semester progresses.

          So the only thing that i really have to show so far is the "Alley Project" that was the first half of my Texture & Lighting course (finishing it counted as my midterm). We were given a blank model (basically the wall, door, handle, curb/street, and pipe attached to the wall), and have to add our own elements to it as well as create textures for everything using only photographs we take with out digital cameras.

          I'm not going to post all the pictures i used, but i will post the 'color' files for the wall and street so you can see what it all looks like.

          So the first image we have is called a "Beauty Pass" where it renders everything in view, applies any textures added to materials, and renders shadows based on the lighting situation. This image was rendered in MentalRay (so the shadows aren't so dark and there's some light bouncing happening). But for the most part, it's very simple.


          This pass is called "Ambient Occlusion" and it basically reads the proximety of objects to one another and adds shading depending on that data (it's also refered to as a "Dirt Layer/Pass"). This is usually rendered in it's own layer and multiplied over the Beauty Pass to add extra shading and light imitation.


          So when you put the two layers together you end up with this image. There's subtle differences, but you can still notice a difference between the two.

          I went ahead and did the same scene but at two different times - just to see how the lighting can kind of change your perception of the textures applied to the objects.


          I'll possibly post more about this later down the road....maybe even take a whole new set of pictures and redo all the textures - maybe.

Monday, March 15, 2010

Updates.....

....coming soon.......


i swear...

Wednesday, February 3, 2010

Do The Hedgehog!


Drawing courtesy of DJ

Friday, January 29, 2010

Raise The Rufus

          So this morning i started messing around with sketchbookpr (continuing from last night) and i just wasn't feeling it, so i decided to go through my vast collection of images from the net and DJ to see what i thought might be fun coloring and getting used to my tablet, and i came across a few chibi versions of notorious FFVII characters. I knew i wasn't going to be able to color all of them, so i picked the one with the simplest outfit and printed out a hard copy. I scaled it down and layed the paper over my wacom tablet and traced over it, transfering it to photoshop. The image to the left is what i got.


          I darkened it a little bit, because when i first traced it (and mind you, no line was gone over twice) i had the pencil's opacity on about 30% - so if i went over a curve a few times, the median of them would be darker than the rest. But i realized that without taking more time to go over and refine it in PS, it would be faster to ink the printed copy, and scan it into PS to then color.


     So the left is the inked version of the drawing DJ did so long ago. It's of Rufus Shinra from FFVII. And the right is what i ended up with after...an hour or so? I'm not sure exactly when i started, but i know i first got on my computer around 10 am and i finished this around Noon (and there was time spent in sketchbook pro, looking for images, printing, inking, and scanning....so an hour is a good guess). It still has that 'sketch' look to it - because of all the little specks and stuff around the lines, but when i'm done coloring it, i'll go in and use the smudge tool to get rid of em.

Thursday, January 28, 2010

Look A' Muh Dais

          So this is an isometric sketch i did a few days ago (forgive me for not cleaning it up in photoshop and getting rid of those isometric guide lines). It's basically a concept for part of the set where the FF Sonic short will take place. There's not a whole lot of detail in it just yet, but there will be - well....it's only fair to warn you that only so much is going to be done by pencil and digital drawing....it's much faster for me to do detail actually in Maya than on one medium and then in Maya.


          So here's me going over the Isometric Sketch in Sketchbook Pro (the drawing tools and aids are awesome in this btw). I'm only going to do a small section of it (only the stairs will get the most drawing done, the pillars won't cover all of the stairs drawn). I'll go in afterwards and try my hand at coloring it just to give it some characer (and practice on my end). But that's what i've got as of tonight, tomorrow i'll work on it a little bit and try to finish the new menu for my job.


          Smaller details and 'Sectional' layouts of the pillars and arches will definitely be in the mix (tho mostly just for practice). So i'm trying to keep stuff on here fresh...check back later.

Monday, January 25, 2010

Stroke Of Luck

          So i got my Wacom Intuos 4 (Lg) digital tablet today, as well as the 2010 version of Sketchbook Pro, and was taking it for a spin to get used to using a pen instead of a mouse and all the 'sensetivity' behind it, and the only thing i really got out of it was this sketch dejon did of Cloud as a hedgehog. Now, granted it's not the best work, i was just getting used to changing brush szes, using the opposite end of the pen as an eraser (which i thought was incredibly intuitive), the only part of the picture i like myself is the gloves.

          So since i've got sketchbook pro now, and it allows for extremely acurate arcs and lines and various other aspects of drawing my free had is always void of, i should, though i'm not sure what they'll be of, be able to post some pretty detailed conceptual designs on here from now on (though probably as sporadic as everything else). My classes only really focus on techniques and concepts (like lighting and texture, rigging, and basically anatomy), so i won't really have any 'projects' that i'll be posting stuff done in sketchbook (though the things i do in ZBrush when i get into it will definitely be posted).

          So that's really all i've got for now, i'm off to read Stop Staring, one of the books i got this semester that i think will really o pen up the way i tackle projects and modeling things. So far i'm onyl a few pages into the book and it's already changed the way i think about lip synching and the way most people go about it (with dozens of various blend shapes for each phoneme, each pose of the mouth keyed on a timeline).

          I've got a couple of other books (one focus entirely on particle systems - maya only - that i'm going to attack in the summer if not earlier). So as i get into my books, if anything visually intriguing comes of them, i'll be sure to post it.

Monday, January 18, 2010

A Head On Our Way...

          So since i got kind of board waiting for stuff i'd rather leave up to "professionals", i went ahead and started making some things on my own for the FF/Sonic Mash-Up. One of which is a few facial expressions that a "Hedgehog" character might have (cuz in the Sonic Universe, certain 'species' have different facial feature constuction - like eyes that are connected or eyes that are seperate from one another).


          So I took this "Shadow" (as only he would look so angry by nature) profile picture DJ drew and erased the majority of the arching 'eyebrows'.


          That gave me this picture. I took this image and went over it a couple of times, drawing in the rest of the eyes as they might appear for various expression (much like eyebrows are used.....though evidently Hedgehogs, through some evolutionary marvel, are without eyebrows and have the capacity to camoflouge their mouth when not talking). So after i thought of the most common ones, the ones i'd need to make Blend Shapes for, i put them side-by-side and got this:


          I then started to go over them with pencil to plot out my edgeloops (*wink* Alex *wink*) and how i'd need to deform the default face to get good representations of these expressions. I haven't finished doing that yet, but i'm well on my way. One of the main hurdles is that i haven't plotted edgelopps on the defaul expression.....so i don't really know how which loops would move since i don't know how many and where and what-have-you.


          But to remedy that, i started making a clay head for what Cloud would look like. I only got about an hour and a half on it (a little less after getting situated and figured out what not to do). I only got as far as his 'jaw' and the left half of his eyes (and while i threw a crude ear in the picture....that's no where near what it's going to look like, just to show where on his head it is and how it looks prior to putting in spikes/hair).

          So this is what i got so far. The eye/pupil is just for kicks...i won't need to plot edgeloops on that - so the finished model won't have any iris/pupils. With the exception of the ears and the spikes, the eye/face is probably only every going to get as far as what i've got now, since it's symetrical i only need to model have and just mirror it when i'm finished. I'll model both ears since they'll be helpful in determining where the spikes go on reference pictures.


          Since it won't really matter unless I got way further than the scope of this 'Short', i figure i might has well post it somewhere...otherwise it'll just be on paper forever.


= = = = = = = = = = = = = = = = = = = = = = = = = = = = = = = = = = = = = = =


          So everyone pretty much knows the elements that compose a Sonic The Hedgehog game right? Robotnik/Some evil force threatens the world in some way and Sonic is seemingly the only who can stop him with his carefree attitude, disregard for personal safety, and a psychopathic desire for the consumtion of Chili Dogs. Early in the Sonic games, it was possible for the player to beat the game without need of the 7 Chaos Emeralds, but not too long ago (i think it might have been Sonic Heroes as the first game to do so) Sega started making it part of the sotryline to collect all 7 Emeralds in order to completely beat the game. If you didn't have them all, you'd get someone of a happy ending, with a little teaser at the end of it.

          And I'll be the first to admit it....Final Fantasy isn't for everyeone or even just anyone. So not too many people might be familiar with the elements that make a Final Fantasy game (although to a certain extent, they're the same as Sonic sans the Emeralds). So rather than generalize it for a Mash Up, DJ and I picked a specific scene that is basically Iconic in the FF Realm - where Sephiroth kills Aeris (and i really don't care what people say.....it's ends in S not TH!)

          So how we're combining the two is by taking the general character designs of Sonic characters and transfering Final Fantasy 7 characters to match the Sonic universe. We're really only going to focus on 3 characters; Cloud (Hedgehog), Aeris (Hedgehog....probably much like Amy), and Sephiroth (Echidna...so as to allow for long 'hair' rather than spikes). We're retelling 2 parts of the FFVII game; where Seph. kills Aeris, and the end where Cloud uses Omnislash. We're also going to encorporate a "Super Sonic" element to allow for the Omnislash (which will be similar to the upgraded version at the end of Advent Children).

          We'll encorporate the Chaos Emeralds too, although they'll basically be like Materia and have powers by themselves (more than Chaos Control too i might add).

          So below i'll go over the concepts for the Emerald/Materia breakdown as far as i took it (and i'm just using stock imagery of gems, actual materia/emeralds might have their own unique look to them - definitely color).

So here we have the Materia of Force. It allows it's user to control Fire based Magic and gives them great physical strength.


Here is the Materia of Agility. Its user can manipulate Lightning based Magic and gains unparalleled speed.


This is the Materia Longevity. User gains limitless Stamina and the power to control Earth based Magic.


This one is the Materia of Mentality. It bestows upon its user the skills of Air based Magic and great Mental Fortitude.


The Materia of Knowledge grants upon its user Water based Magic and unbelieveable Wisdom in every aspect.


This is the Materia of Being. It allows its user to conjur Spirit based Magic and provides Imortality.


This is the rarest of Materia - it might not even truely exist. It is the Materia of Unity. It allows for the manipulation of Time and all Magic and gives its user the ability to assimilate any and all other magic and Materia.

Sunday, January 17, 2010

Tip Of The....Iceberg?

          Okay, rather than try and include everythig in one long ass post, i think i'll chip away at it till i'm all caught up (Usher). So a lot of things have happened since my last post way the fuck back in October; I switched jobs (from building roof and floor trusses to being a waiter in a restaurant), I barely passed my classes last semester (one i actually got 'administratively dropped' because things were so hectic i had technically been 'absent' for 3 weeks), and some other things that can't be quickly summarized.

          The job thing really isn't all that important, it's a typical job change - miss the guys i used to work with and love some of the regulars at my new job (and the extra cash and not having tax taken out of wages doesn't hurt either......not till April 16th anyway).

I've been working on a lot of things (mostly in the concept stage tho) like the collaboration with my friend DJ with using Sonic characters and elements to recreate the "Death To Aeris" scene from Final Fantasy 7. I've been chipping away at the major "Kingdom Hearts/Final Fantasy" story i've been working on....i won't be comfortable doing anything in the 3D realm until i've got another few classes or semesters of Maya under my belt (and certain 2D artists quit dragging their feet *cough*DJ*cough*).

          I've already registered for the Spring '10 semester, and i'll be taking ALL MAYA CLASSES (finally). I've got a class on Rigging, one on Lighting & Texturing, and my last one is Organic Modeling (using Multi-patch techniques and what-have-you). So i'm really looking forward to all of those classes (especially the Light/Texture cuz i usually spend a good amount of time on that anyway just for fun).

          This semester feels like it's going to be a good semester, all classes that involve maya (so actually having to be home to use clay or charcoal/canvas isn't the slightes bit of an issue). My Tax return should be pretty good, so that'll probably go to flying some friends out during spring break or my birthday. And the way my work schedule is and my 'projected' schedule for working on school, i'll probably have a good amount of time to go to the gym on a regular basis (i really love running and would like to, as goofy as it sounds, fill my shirt a little more.....too bad there's no excersize i can do to fill my underwear a little more - "Ladies, am i right?"

          Well that's about all i've really got to say, the sparknotes version anyway, and the next post, now that i'll be taking my laptop to a job that has WiFi, shouldn't be too far off and should be pretty frequent.

Friday, October 9, 2009

God Almighty We Are Done At Last!

          So finally finished my Red Mage model as much as i'm going to try for the scope of this particular class (but when it's over, i'm definitely going to try and add some more zest to it).


          So this is a 'turntable' i created when i finished my model - it's a composite of two different layers, a 'Surface Shader' layer, and an 'Ambient Occlusion' layer. it's an extremely time consuming render process, mostly for the AO, but it beats trying to fake the kind of lighting effect you get from it as i'm not that experienced in lighting and Global Illumination yet.....yet. So the only part of the original model that's there is the head (it goes down to about the collar bone and terminates). So the gloves, boots, greaves, mostly everything will be bound and skinned to the skeleton i'm about to create rather than bind/skinning the model and then creating influences for the objects places over his body....man - PAIN!

          For the most part that's all i've got done, plus some renders in Mental Ray (with physicalSun/Sky) of the 'set' i'm going to use for my animation
.

Monday, September 21, 2009

POST Traumatic Stress

          So i totally forgot to add this image to my last post and thought it was well worth posting. just the outline of the Red Mage character design, colored briefly in photoshop, and labeled enough to know what all the difference pieces are that are going to be modeled.

          Enjoy.


**Opens in new window.

Sunday, September 20, 2009

WIP it good.

          So anoter week has gone by and i have made some improvements over my last few posts - though i'm only going to show some of them. I inked and added detail to my storyboards (mostly spacial depth stuff so you get a sense of things), inked and colored the "Front View" of my Red Mage design, inked the Back View, and made sketches for my "Set".

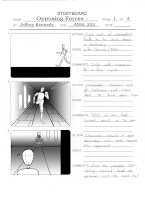
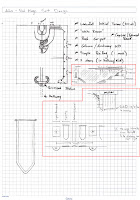
          Page 1: I don't know how well this is going to work out, but i'm gonna try it anyway. Recently they've been showing episodes of Teen Titans on CN and Boomerang, and i love some of the styles they use to show certain things; like when they have a duel or someone running a long distance or something, they'll have the bottome half of the screen be completely black (to illustrate the ground the they're running on and force the subject into the middle of the screen without getting so close). That's what i'm going to try and do in some of the panels/shots of this animation (Spec. Panels 1 & 6-9)


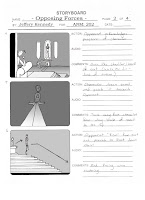
          Page 2: Not much has changed besides the gradients added in Photoshop. Same stuff as the pencil version.


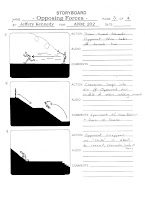
          Page 3: I decided what was going to happen in Panel 7, and it can happen quite a few ways too...though essentially they are all the same. The character can throw is sword "Blade-over-Hilt" and catch it with just a vertical jump before landing/striking downward - or - the character can throw it "Sideways" and catch it with a "jump-and-a-spin" before striking sideways. I would personally like to see the sideways one because the stance/pose he'd be left in would be more dynamic......but the blade over hilt would be easier to animate overall.


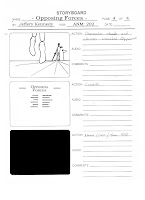
          Page 4: So this is essentially what the animation is going to be, though if it looks like it'll be longer than 30 seconds i have ideas of whta actions to cut/simplify/overlap. But either way, after the semester is done, depending on how well i picked up on the 'animating' principles and process, i'm definitely planning to make a longer verson of this idea...with more action and fighting than right before Demi Moore left Bruce for Ashton.


          So the details of the overall scene are somewhat lacking in the storyboards, so i decided to make a preliminary sketch to plot out the key points before i go in to model it (though usually i can sit down with nothing in my head and after a few hours come out with something awesome).

          It might be hard to tell what way the stairs are going and what is a new level and such, but i should have some rought renders and models in a week or two, so don't fret if it's hard to read.

          It's mostly just the basic outline of everything, once i actually go into maya and start modeling, things might change to look more 'organic' or natural....so the set probably won't look like this 100%...but it'll look relatively similar.


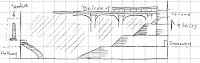
          Side Profile of the main room of the 'set'.


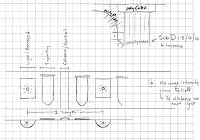
          Mostly what all is in this is just basic geometry and lighting elements, trying to say that the lights should only illuminate from tapestry to tapestry....so there will be black patches every so many feet (to try and accomplish a certain effect for the first shot of my storyboard).

Wednesday, September 9, 2009

Are you Board with my Story?

     So the first week of school is half over, despite starting a week ago, and we're now able to submit our homework for the first week - which are Storyboards for your final animation concept. Mine are below and will go into further explaination later if at all (i think between the "Action" and "Comments" you can get the gesture of what i'm going for. Quite a bit is left out of the storyboards, esp. the environment - but the time it would take me to draw them to the level of detail you could appreciate....i could just as quickly made the actual model and show you from more angles and detail.

     Page 1 of my storyboard details the build up of the first scene - and the frame of the camera isn't going to be showing both feet at the same time, it'll more than likely be position in the middle - as to get the passing of both (i might try two version, one staying with the character, and the other catching up to and potentially passing him).
     Also, i'm going to try and space the lighting to make it seem more intensified, like when a person is riding an elevator and is lit every other second or so from the various floors/shaft lighting.


     What Panel 5 doesn't show is that before it starts tracking along the blade of the sword, i'll actually animate him unsheathing it (as best i can anyway lol) and do some fancy cutting so it doesn't look like it's own scene/shot before the track (FYI: tracking is moving closer or pulling back...not to be confused with "Zoom")


     Panel 7 left blank as i have not yet decided how i want my character to "Take off" towards the other person (whether there's someone what of a shockwave and he literally flies off into the room, or if i want to manipulate the lense angle to give it that 'worm's/fish eye view.


     Panel 10 is the point to which i am setting my semester goal - "Get to at least this point". I have the rest of the whole scene planned out (including things like the main character being thrown across the floor and flailling wildly and being thrown at a wall and doing that cliche 'sword-through-cloth to slow down his fall). So if i get to this point and have way more time than i know what to do with, i'll keep it going (which i intend to during the winter anyway).

So that's that, i'll post the designs for my main character and his "Opponent" when i finish doing all side (front, back, and side) and have designed the finer details of their costumes (which involves drinking paint and adding belts......meh DJ gets it anyway).